Presentation
Students should keep it in mind as they document key steps along the way—with photographs, sketches and handwritten notes. That way, when it comes time to post things on their display board, they’ll have more than enough to choose from. The value of the presentation should not be underestimated. After weeks of hard work, it all comes down to a few minutes—that’s how long a student has to captivate each group of visitors at their booth.

- 1Left Panel
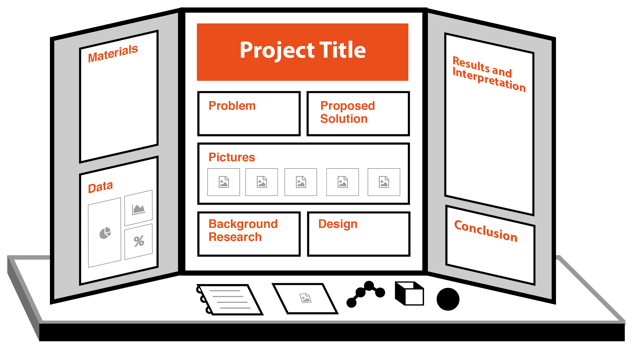
List the materials used during the engineering design process. Display the data collected using images, charts, tables, graphs, and notes.
Expert tip! Label all graphs, charts, and tables. On graphs, make sure you label the x and y axes. Space elements evenly across your layout, to achieve a balanced, consistent look.
- 2Main Panel
Treat the center panel of the tri-fold board as center stage. Come up with a catchy title and display it prominently. This is where the story of the experiment or investigation should be chronicled in precise steps. Typically, this panel includes the problem, your proposed solution, pictures, background research, and your design or model.
Expert tip! Learn how to edit your text down to the essentials. Through creative use of color, type, and graphic elements, you can make your ideas pop and bring your project to life. Be sure every photo has a caption beneath it. Write descriptive captions for photos.
- 3Right Panel
This is typically where your results and conclusion are displayed. You may display your results using tables, charts, graphs, and pictures. Use a ruler, yardstick or T-square to measure and cut evenly.
Expert tip! Proofread and spellcheck all text before sticking it on your display board. Use black or dark colors for type and make the type large enough to read from four feet away. As a general rule, use 24 pt. type for headings, 16 pt. type for text blocks. Use subheads and bullet points rather than long paragraphs of dense text.
- 4Artifacts
May include models, working models, prototypes, an invention, or materials used.


